Features
Gallery10
Nostalgia is a big part of Sandown International Motor Raceway’s story. Its significance in Australian motorsport is huge.
Its history, as the 161-lap lead into the Bathurst 1000, is rich. Yet, it’s often hard to speak emotively about Sandown when it comes to the actual track. Apart from a fast and descending left-hander at the end of the back straight, the 3.1km anticlockwise track is often deemed mundane compared to other Aussie circuits.
Our hired gun driver, Warren Luff, is here to tell you otherwise. Now it’s worth mentioning that Luffy has had a lot of success in Supercars at the Sandown 500. However, he assures us winning the event in 2012 (with Craig Lowndes) and 2016 (with Garth Tander) hasn’t given the Gold Coast local rose-tinted sunglasses.
10
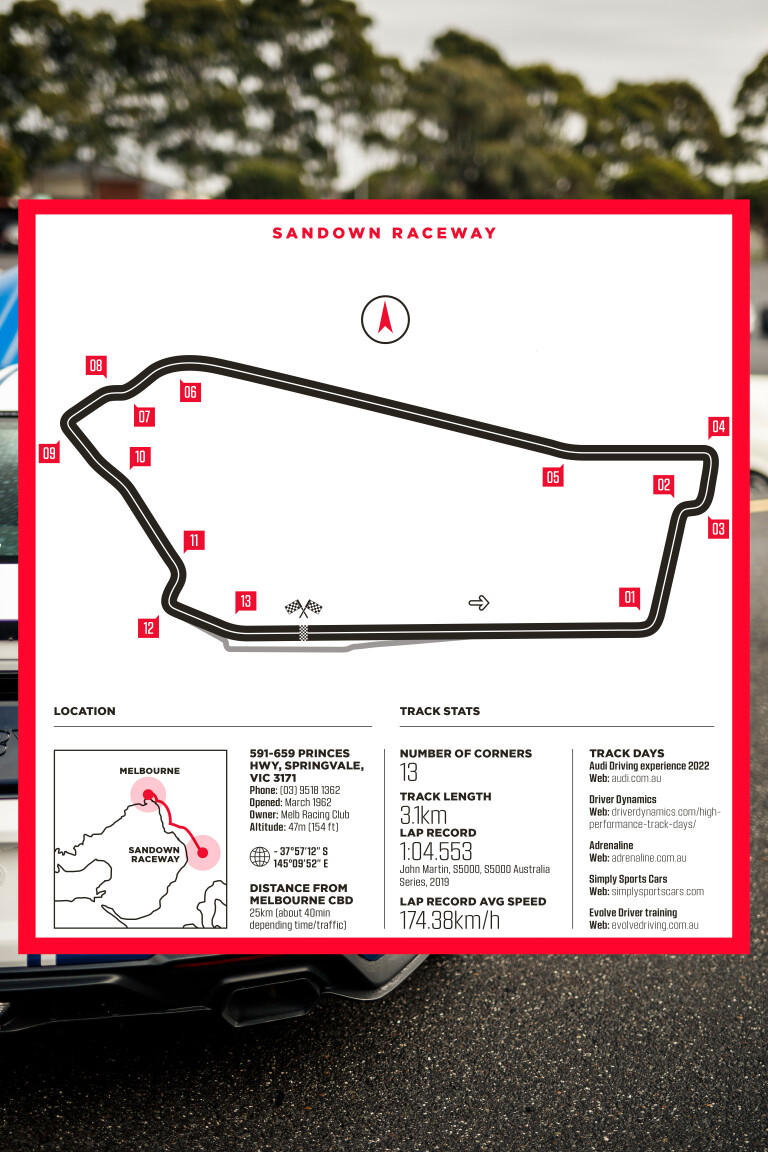
The facility is located in the suburb of Springvale in Melbourne, long before its positioning was considered to be close to the CBD (25km away). As a result of the urban sprawl, Sandown’s future is constantly under a cloud and it seems to be perpetually under a stay of execution.
While the horse racing section dates back to the 19th century, the tarmac track opened in 1962 and the venue held its first Australian Touring Car Championship event in 1965. Norm Beechey’s result here is significant. Not only did he win by a lap (in a 40-lap race), but it was the first global victory for the Ford Mustang in motor racing.
10
It’s ironic that the track encapsulating a horse-racing track would be so dependent on horsepower – just of a different kind. Here’s how to get the best out of Sandown.
Section One: Coming in Hot
10
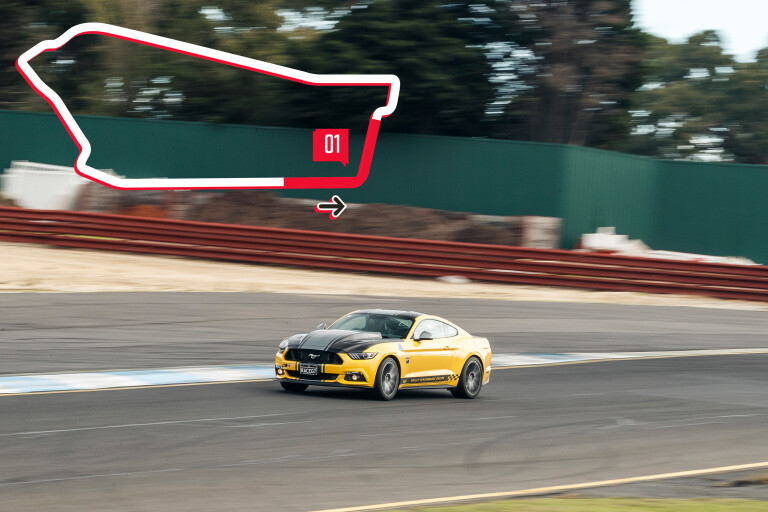
Turn One
The approach into Turn One is at quite high speed and the braking zone is noticeably bumpy, making things tricky.
Finding an appropriate braking mark is important given the varied surface changes. It’s worth noting that it’s an even tougher task in the wet.
Be careful with your downchanges as it’s easy to unsettle the car. Third gear is usually appropriate. It’s important to keep the nose loaded by trailing the brake most of the way to the apex, while keeping in mind that it’s a low-grip surface and easy to understeer off on exit.
The apex is just after the middle of the corner and you can be quite assertive in hustling the car there before smoothly transitioning back on the throttle. If you find you’re running out of road on exit, leave your turn-in a bit later and be more aggressive getting to the apex. There is loads of paved run-off.
MOTOR Tip
Always check your left mirror before turning in to check for other cars. Even on track days, it’s a good place to overtake slower cars in a safe way. However, the further you go to the left the worse the bumps are, so keep that in mind as it’s much harder to pull up. Be very careful.
Section Two: The Technical Bit
10
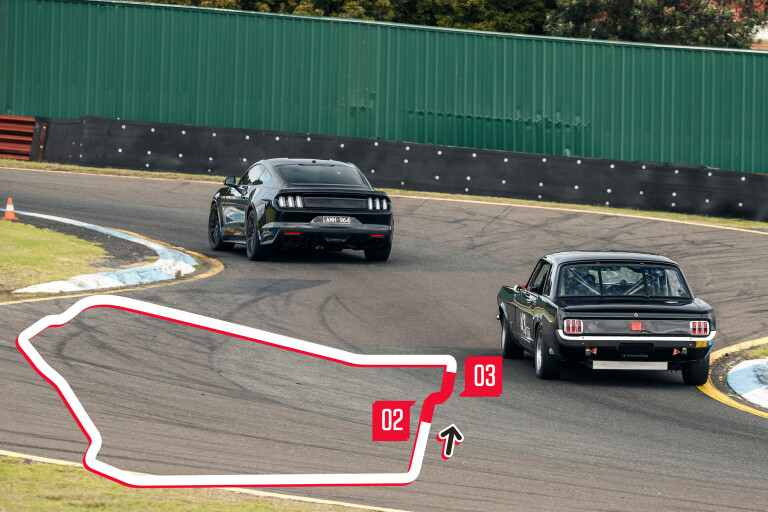
Turns Two and Three
Depending on your run out of Turn One you may need to grab a higher gear briefly before you brake. Be careful not to hit the hard cut/limiter.
You need to pay attention as to not stab at the brakes here and unsettle the rear on the way into the corner. Ideally you brake across towards the apex of Two, but it makes it easy to lose the rear.
Avoid turning too early because this will push you across to Three and make it tighter than it needs to be – or push you up onto the kerb. Through here you’ll want to use as little of the kerb as possible. They are very aggressive and will unsettle your car.
MOTOR Tip
Don’t think you’re in a Supercar or Porsche Carrera Cup Car and can smash the kerbs – because in a road car, you can’t. A road car isn’t going to have the durability to cope with the impact and it will also unsettle the balance too much. The best plan is to at most kiss the kerb’s base at Two and Three.
Section Three: Patience
10
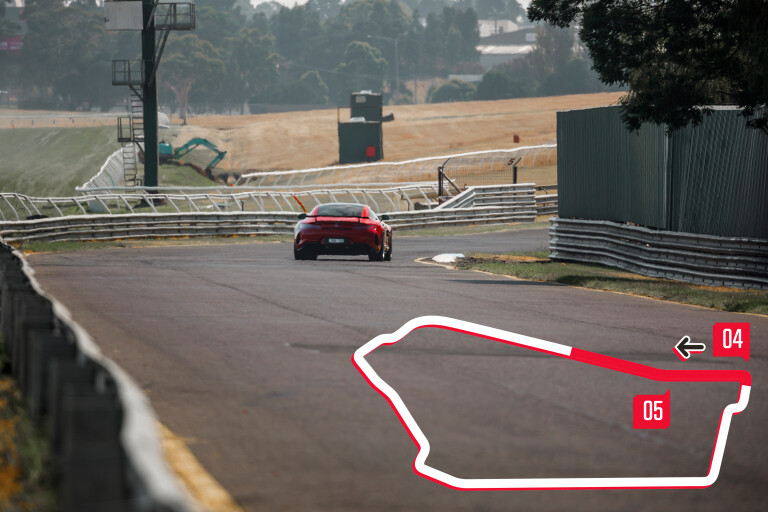
Turn Four
Making sure you achieve peak top speed down the back straight starts here. And there is now more mid-corner grip than ever with fresher tarmac. On face value it’s a relatively simple 90-degree, second-gear corner, but it is a critical section to get right for your overall lap time.
The key is to not get too excited and rush the entry and understeer wide out onto the exit kerb. It’s important to let the car rotate through the midpoint of Turn Four before seeing how quickly you can return to full throttle. Be patient so you don’t light up the tyres (front or rear) and waste valuable momentum.
Turn Five
This mild kink will be flat in all road cars, but look for standing water in the wet.
MOTOR Tip
A front-wheel-drive car is a lot fun through corners One to Four and you can dance the back end of the car around a bit. In a rear-drive car, you can use the throttle to turn the car and balance before powering out.
Section Four: Commitment
10
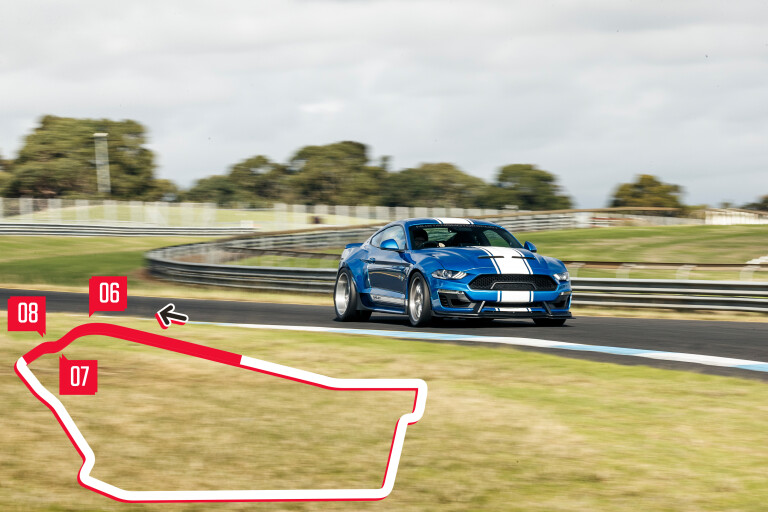
Turns Six, Seven and Eight
Turn Six is the most satisfying corner at Sandown. And it’s also a section you definitely don’t want to get wrong – even with the new run-off tarmac introduced for safety.
Reaching top gear coming over the crest will be likely in most cars before applying reasonable brake pressure and slotting down a gear on entry.
Balancing the weight on the outside front to keep it loaded is key as the car will naturally want to understeer. Keep in mind you can get a big head wind or tail wind which will affect not only your braking, but also the balance of the car on turn in.
As you come through Turn Six you want to line up the Turn Seven kerb and drive over it – depending on the compliance of the car you’re in. Ideally you should be going straight over it.
Be careful if you understeer through Six as the right-hand side of the car will still be loaded up for the Turn Seven kerb. You should be back on the throttle just past the Turn Six apex and then over the kerb at Seven.
Eight isn’t really a corner, but a slight kink on the way down to Nine. However, the kerb on the inside can be used as a brake marker once the car settles past Seven.
MOTOR Tip
The saw-tooth kerb on the inside is something that you can use but you need to be careful about brake knock off when you arrive at Turn Nine. It’s more common in race cars, but can happen with serious production cars, too. It means that as the tyre is going over the kerb the vibrations push the pistons back in the calipers. When you go to brake next the pedal will feel soft.
Section Five: Use the Kerb
10
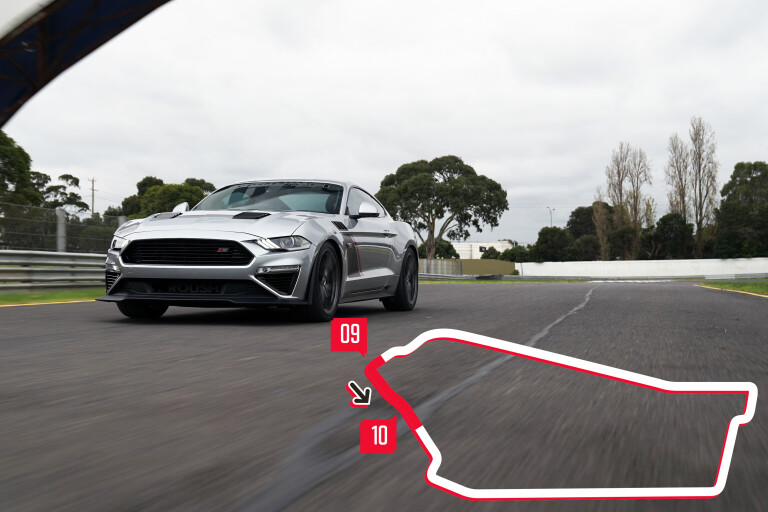
Turns Nine and 10
It’s a very easy corner to become too greedy under brakes and go in way too hot. Doing so results in an easy lock (cars without ABS) or understeering wide.
Be conscious to keep the car as stable as possible, however, you actually brake coming across the track to the outside of the entry to Turn Nine after clearing Eight.
You won’t get the car parallel with the outside kerb prior to braking. It’s been resurfaced in the recent past so the mid-corner speed is now higher. You can also use the inside kerb as it helps shift the weight to the outside rear of the car.
Turn in early to get to the apex. Focusing on power down on exit is important as it’ll impact your run to the final section. Turn 10 is a mild kink and doesn’t require much input on the run down to Turn 11 and 12.
MOTOR Tip
The general rule at Sandown in a production car, especially at corner apex, is to stay off the kerbs. However, turn Nine is the big exception to that rule given the surface changes and the raising of the bitumen level, which has essentially lowered the kerb.
Getting across it nicely will aid lap times. However, some track events/days might use a cone or a tyre bundle there.
Section Six: The Run Home
10
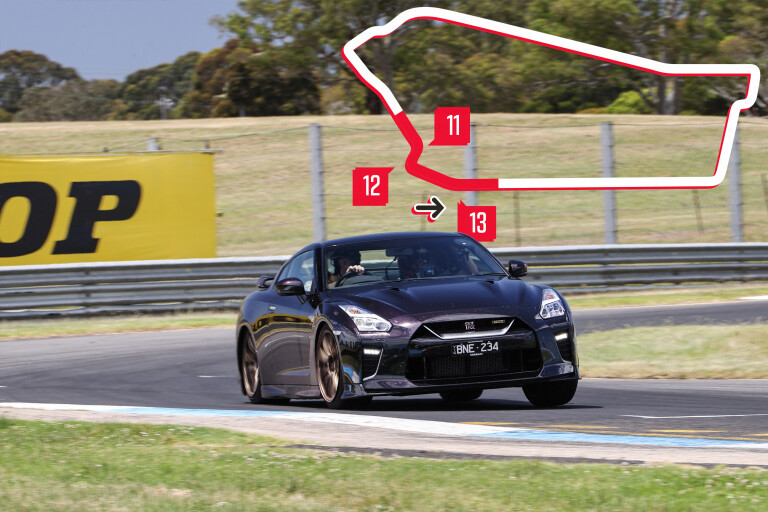
Turns 11 and 12
In most cars it’ll be a third- or fourth-gear approach before braking very late and trailing the pedal a long way into the apex. The reason you want to brake as late as possible and square it off is to keep the car as much to the right on exit as possible to aid your entry into 12.
This also sets up your run onto the long front straight. Provided you get Turn 11 right, 12 is a lighter brake application before getting on the power early.
Use the entire exit kerb, which then becomes the pit-lane entry. So, be careful that the person in front of you isn’t peeling off as you prepare to charge down the front straight.
MOTOR Tip
Sandown is often underestimated as a technical challenge and can be viewed as a simply a series of 90-degree corners. It isn’t, and it really punishes you for small mistakes.
Turns 12 and Four are very important to get right, especially on corner exit, because they lead onto the longest straights. There’s no two ways about it, Sandown is a power circuit, so getting the grunt to translate to the track is very important for lap time.
Sandown Raceway makes the world stage
A top-class facility right on the CBD's door step - enjoy it while it lasts!
Sandown raceway hasn’t always been the same layout it is today. In fact, it started out as a much more free-flowing course from 1962 to 1984 despite covering the same 3.1km distance, with Peter Brock holding the lap record of 1:10.8. However, that all changed in 1984.
With an ambition to hold international championships, the track was extended (cutting out the current Turn Six roller coaster) with a technical in-field section.
The track was increased to 3.9km to meet FIA track length regulations. The Australian Touring Car Championship ran this configuration, but the desired World Sportscar Championship arrived in 1984 and 1988 – the only times the category has raced in Australia. The lap record is held by Jean-Louis Schlesser, setting a time of 1:33.58 in a Sauber Mercedes C9. The pits was also moved to its current position on the front straight.
10
From the end of 1988 onwards the current 13-turn track has been used, with the lap record of 1:04.55 being held by John Martin in an S5000.
For something a little more realistic, the Production Car class clocks 1:20.62 with a Mitsubishi Lancer Evo X claiming that time. Sandown is also extensively used for driver training, not just racing.
The massive grand stand along the front straight is iconic and a popular viewing spot. So is the hill at Turn Six, with various other park-and-view areas.
Parking options are available, but public transport is preferable with train stations nearby. Otherwise, using Dandenong Road is the best option to drive there.
Please enable JavaScript to view the comments powered by Disqus.
COMMENTS